Drywall is gypsum board: a chalk core in a paper skin. It is cheap, flat, and easy to damage, which is why every house collects holes. The repair is not hard, but it fails in one predictable way: people treat it as filling a hole with paste. It is actually building a shallow, wide, layered surface that tricks the eye, and the layers are the whole technique.
Size the hole first
Small (under 1 cm): nail holes, picture hooks, anchors pulled out. Skip this guide's patching steps. Push any loose paper flat, fill with spackle slightly proud of the surface, let it dry, sand flush, spot-prime, paint. Ten minutes per hole.
Medium (roughly 2 to 15 cm): doorknob holes, furniture dings, old electrical boxes. Self-adhesive mesh patch, below.
Large (over 15 cm): a real piece of drywall on a backer, also below. Mesh patches flex across wide spans and the finish cracks along the edges within a season.
Tools and materials
- Joint compound: a small tub of lightweight all-purpose, or setting compound if you want same-day coats
- Self-adhesive mesh patch sized 5 cm wider than the hole, or a drywall offcut and a scrap of wood for large holes
- Putty knives: 10 cm and 15 cm (wider is better for the last coat)
- 120 and 150/220 grit sanding sponge or screen
- Utility knife, dust mask, drop cloth
- Primer. Non-negotiable, and the step everyone wants to skip
Medium holes: the mesh patch method
- Wipe the area clean. Press any crushed drywall flat or trim loose paper with the knife. The patch needs a sound, flat ring around the hole.
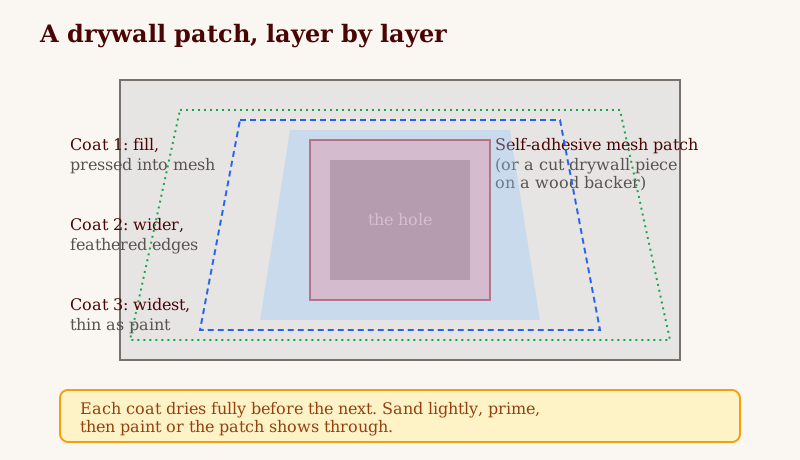
- Centre the mesh patch over the hole and press it down firmly. It should extend at least 2 to 3 cm onto solid wall on every side.
- Coat one. Load the 10 cm knife and press compound through the mesh, working from the middle outward. The goal is to fill and embed the mesh, not to build height. Scrape the knife clean at a low angle so the coat stays thin. The mesh pattern will still show. That is correct.
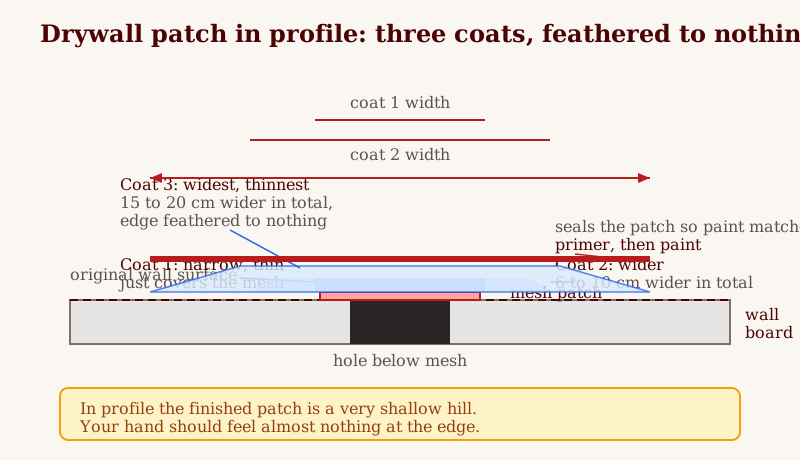
- Let it dry fully. Coat two goes on wider, extending 3 to 5 cm past the first coat on all sides, feathering the edges down to nothing. Thin. Let it dry.
- Coat three is the widest and thinnest, applied with the 15 cm knife, mostly to fill sanding scratches and low spots.
- Sand lightly with 120, then 150. Sight along the wall with a lamp held low; raking light shows every bump your hand misses.
- Dust off, prime, then paint. Without primer the patch absorbs paint at a different rate and shows as a dull island forever. This step is the difference between invisible and obvious.
Advertisement
How each coat should feel
You are not spreading filler. You are building a very shallow hill that the eye cannot find.
- Pressure. Coat one takes firm pressure: you want to hear the knife scrape and see compound forced through the mesh squares. Coats two and three take less. By coat three the knife mostly floats, held at about 30 degrees, and you are shaving, not spreading.
- Load. A marble-sized blob does more work than a golf ball. Excess compound becomes sanding work and dust. If the knife leaves ridges on both edges, you loaded too much.
- Sound and look. A wet coat looks glossy for a minute, then turns matte as it sets. Dry compound goes pale and chalky. If your sanding screen gums up in the first pass, stop: the coat is still wet inside.
- Done test. Close your eyes and run a flat palm over the patch and out onto the wall. Done feels like one surface. A fingertip finds edges your palm forgives, so trust the palm and the low lamp, not a single finger.
Large holes: backer and a real patch
- Cut the damage out to a square or rectangle with the knife or a drywall saw. Cutting to a shape you can measure is easier than fitting an odd hole.
- Cut a piece of scrap wood (a paint stir stick works for small-large, plywood or a 1x3 for bigger) about 10 cm longer than the opening. Slip it behind the wall, centre it, and drive drywall screws through the wall face into its ends.
- Cut your drywall piece to the square, screw it to the backer, and you now have a flush patch with solid support.
- Tape the seams with mesh tape and finish with the same three coats as above, wider each time.
When the patch does not disappear
Hairline crack along the edge. The coat was too thick at the edge or the layer below was still cool and damp to the touch. Thick edges shrink and open a line. Sand back until the crack is gone, dust off, and re-coat thin with the edge pulled to nothing. A crack filled with paint alone comes back.
Bubbles and pinholes. Air in the tub, a dusty patch, or a knife lifted mid-stroke. They look like tiny craters once the coat dries. Do not sand them deeper. Press the next coat in harder, pull in one direction, and keep it thin: pressure pushes compound into the holes instead of bridging over them.
Patch still visible after paint. Run the palm test and the lamp test again. If you feel a ridge, the feather was too short: add one wider, thinner coat rather than more paint. If the surface feels flat but looks dull or shiny at an angle, that is flashing: the primer step was skipped or spotty. One even coat of primer over the patch and a hand-width onto the wall, then paint, fixes it. Texture mismatch counts too: a dead-smooth patch on a lightly textured wall reads as a billboard, so stipple the final primer coat with a roller to match.
Sagging or soft centre. The patch was too big for mesh alone and it flexes when pressed. No topcoat fixes flex. Cut it out and use the backer method above. Press the finished patch with a thumb: it should feel like wall, not like a drum.
Mistakes that undo good patching
- One thick coat instead of three thin ones. Thick coats shrink, crack, and take far longer to dry in the middle than on the surface.
- Sanding between coats down to the mesh. You only need to knock off ridges and nibs. Seeing mesh again means you removed the coat you just added.
- Coating over loose paper or dust. Compound bonds to dust, then lets go with the dust. Trim loose paper, wipe clean, then coat.
- Skipping primer to save ten minutes. The patch will absorb paint at a different rate and show in raking light for the life of the paint job.
- Painting to judge the repair. Wet paint hides ridges and dry primer reveals them. Judge with the lamp and your palm before the colour coat goes on.
Timing and cost
A mesh patch job is about 30 minutes of hands-on work spread over two days with drying, or one long afternoon with setting compound. Materials run CAD $25 to $45 if you own nothing, and the knives and tub of compound cover every future hole in the house. A drywall contractor's minimum call usually exceeds that before they open a toolbox.
Two limits: water-stained drywall that is soft or crumbly needs the damaged board cut out back to dry material, and a hole that keeps reappearing in the same spot (a door with no stop) needs the cause fixed too. Fit a door stop while you patch; the squeaky door guide covers the stop and hinge hardware at the same time. Once the patch is painted, protect the wall behind the tub with a proper seal as well: resealing bathtub caulk is the companion job in every bathroom.