A squeaky door is announcing friction in a specific place: the hinge pin rubbing dry inside the barrel. You can silence it for a month with a spray can aimed at the outside, or fix it for years in five minutes per hinge by taking the pin out and greasing the metal itself. Doors have been hanging on this exact hardware for a century, and the cure has not changed because the problem has not changed.
The real fix: pin out, clean, grease, in
Work one hinge at a time and the door never comes off.
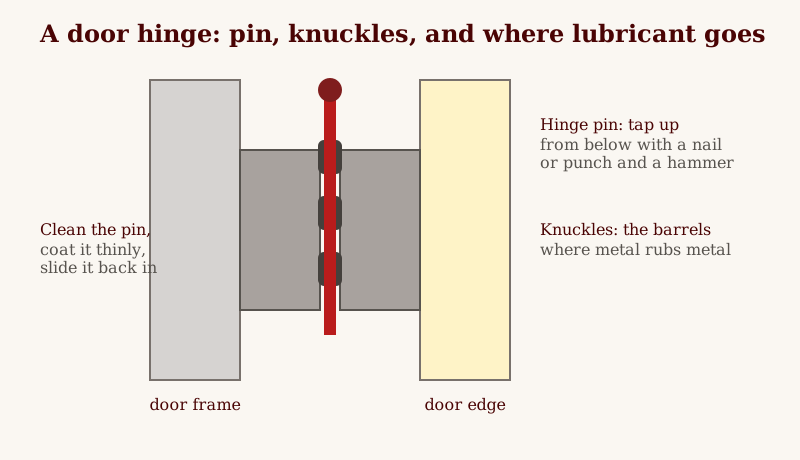
- Close the door. Place a nail or a pin punch under the hinge pin's bottom tip and tap upward with a hammer. When the pin's head clears the barrel, pull it out by hand or with pliers. Stubborn pins get a shot of penetrating spray and two minutes of patience.
- Wipe the pin down. Most come out black with old oil and metal dust; that grit is half the noise. Clean until the steel shines, with a cloth and a little solvent if needed.
- Coat the pin thinly with white lithium grease or silicone grease along its full length.
- Slide it back in and tap it home. Swing the door ten times. Silence, or close to it.
- Repeat per hinge, worst first. Often the top hinge alone is the whole concert.
Wipe any squeeze-out immediately; grease on paint is a stain with ambitions.
The sagging door behind the squeak
Close the door slowly and watch the gaps. A door that hangs true shows an even gap all around. One that sags crowds the latch-side bottom corner and opens a wedge at the top. Sag loads the hinges sideways, which both squeaks and eventually pulls screws out of the frame.
The fix is at the top hinge, which carries the load:
- Tighten every screw in the top hinge, frame side first. Quarter-turn each; do not reef on them.
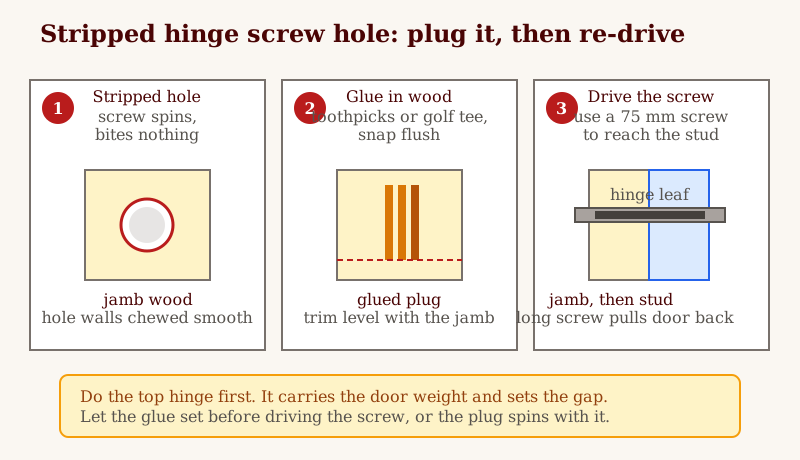
- A screw that spins without biting has a stripped hole. Remove it, glue two or three wooden toothpicks or a golf tee into the hole, let the glue set, snap it flush, and drive the screw again. The wood gives the threads something to hold.
- A longer screw (75 mm) in the top hinge can reach through the frame into the stud behind it and pull a sagging door back noticeably. Use one, in the hole nearest the stud, and watch the gap even out as it seats.
Timing and feel, because this step is easy to rush: wood glue needs its set time before the screw puts load on it, so give the plug an hour, longer in a cold room, and trim it flush with a chisel or sharp knife rather than sanding, which rounds the surface the hinge sits on. Drive the replacement screw by hand for the last turns: you should feel the threads bite and the driver resist evenly. A screw that gets suddenly easy again has re-stripped the plug: pull it, add one more toothpick, and try again. With the 75 mm screw, drive slowly and watch the top gap close a fraction at a time. Stop when the gap looks even and the latch clicks without lifting the handle: over-driving can rack the frame toward you.
Advertisement
If the squeak comes back
First, check what you used. Light penetrating sprays free a stuck pin and then leave, so a squeak that returns in about a month on schedule is usually just dry metal again. Pull the pin, clean it until the cloth stays clean, and grease it properly this time.
Second, check the pin and barrel. A pin that comes out scored or a barrel that rocks side to side is worn. Grease quiets worn metal briefly, but play in the hinge keeps working the grease out. Replace that hinge: take the old one to the shop to match the size and screw pattern. It is about a CAD $5 part and a ten minute swap, one leaf at a time with the door closed and supported.
Third, check the door, not the hinge. A returning squeak with fresh grease often means sag has returned and the hinge is loaded sideways again. Re-check the top hinge screws and the gap pattern before you add more lubricant.
If the door still rubs
Lubricant never fixed a rub. Find the rub first: look for the shiny polished patch on the frame paint or the dented weatherstrip, or close the door on a strip of paper and pull: the spot where the paper grips hardest is the contact point.
- Rub at the top latch corner, gap wide at the top hinge side. Classic sag. Top hinge screws, plug repair, or the 75 mm stud screw above.
- Rub along the bottom edge. The door itself has swollen in humid weather or the hinges have worn enough to drop it. Let it dry through a heating season if the rub is seasonal and slight; a persistent hard rub needs a few passes with a plane on the bottom edge, a little at a time, resealed with paint so it does not drink moisture again.
- Rub that appeared after painting. Paint build-up on the frame edge adds up over coats. Scrape the contact patch back to a single sound coat rather than planing good wood.
Work in small steps and test after each one. A door gives you feedback right away: the gap evens, the latch drops in without a lift, the swing closes with one finger of pressure instead of a shoulder.
Mistakes that keep a door noisy
- Spraying the outside of a closed hinge and calling it done. Most of the spray lands on paint. The rubbing surface is inside the barrel, around the pin.
- Doing all the hinges at once with the door unsupported. One hinge at a time keeps the door hung. Pull every pin together and you are re-hanging a door, not greasing one.
- Over-tightening hinge screws in old wood. Snug and biting is the target. Past that you chew the hole out and create the stripped hole you then have to plug.
- Greasing a dirty pin. New grease over black grit makes grinding paste. Clean first, then grease.
- Planing before checking screws. Most rubs are sag, and sag is a screw problem. The plane is the last tool, not the first.
A door that swings true also seals true, which is why this pairs with weatherstripping: seal a crooked door and you weatherstrip a moving target. And while the tools are out, the drywall patch guide covers the doorknob dent that the same door probably made in the wall behind it; fit a stop this time.