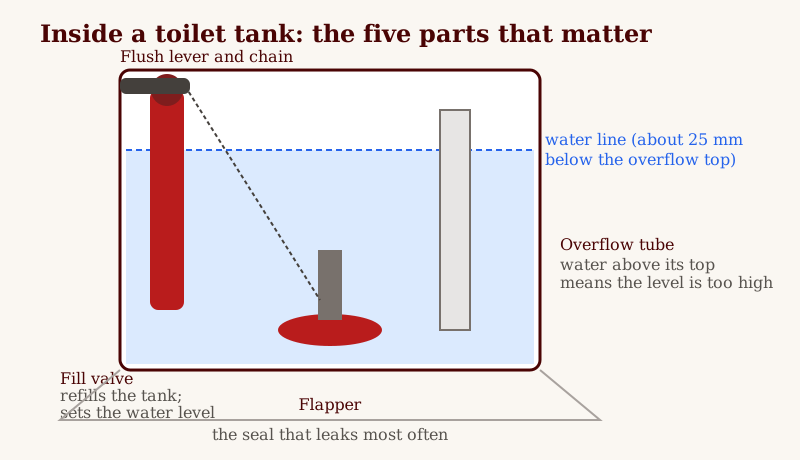
A toilet that runs by itself is not haunted and rarely broken in any serious way. Inside the tank there are five working parts, and three of them explain nearly every case of phantom flushing, constant trickling, or a fill valve that sighs every twenty minutes. The fix is cheap. The diagnosis is the part people skip, so they replace the wrong part.
The five-minute diagnosis
Take the lid off and look before you touch anything.
The colour test. Add food colouring or strong coffee to the tank water. Do not flush. Wait 15 to 20 minutes. Colour in the bowl means the flapper is leaking tank water into the bowl around the clock.
The overflow test. If the water surface sits at or above the top of the overflow tube, the level is simply set too high and water is spilling down the tube continuously. You will often hear this one as a faint, constant trickle.
The lift test. If neither test shows anything, lift the float or the fill valve float cup gently upward. If the running stops when you lift and starts when you release, the fill valve is worn and no longer shuts off cleanly at its own setting.
Write down which fault you found. It decides what you buy, and each part costs less than a pizza.
Tools and materials
- Replacement flapper, sized to your flush valve (2-inch is most common, 3-inch on many newer toilets)
- Replacement fill valve, only if the lift test points there (universal models fit most tanks)
- Sponge and an old towel
- Adjustable wrench, only if the fill valve is being replaced
- Food colouring for the test
Total parts cost is typically CAD $10 to $35 depending on which fault you found. Time: 20 to 45 minutes.
Fix 1: replace the flapper
- Turn the shutoff valve behind the toilet clockwise until it stops. Flush to empty the tank, then sponge out the remaining water.
- Unhook the old flapper from the pegs on the flush valve and detach the chain from the flush lever.
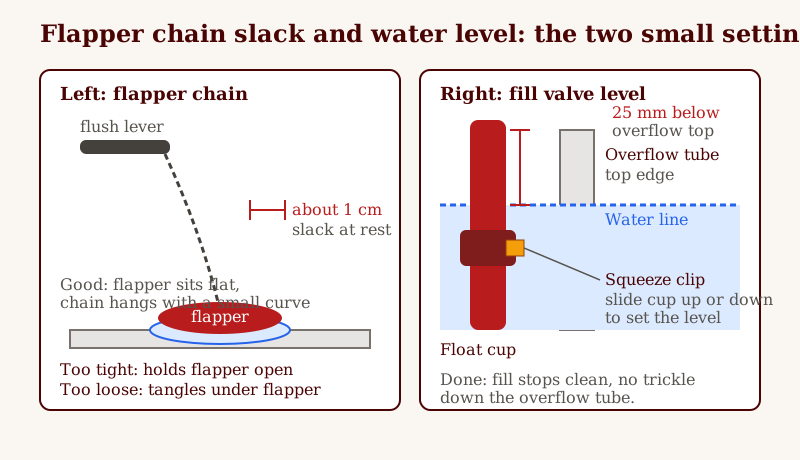
- Snap the new flapper onto the same pegs. Reconnect the chain with a little slack, about 1 cm. A chain pulled tight holds the flapper open; a chain left long tangles under it. Both cause running.
- Turn the water back on, let the tank fill, and flush three times. Watch the flapper seat each time.
- Repeat the colour test. Still water in the bowl after 20 minutes means the seal is good.
If a new flapper still leaks, run a finger around the flush valve seat it seals against. Mineral crust or a nick in the seat is the usual culprit. A gentle clean with a non-scratch pad fixes most; a badly pitted seat is a bigger job and a fair point to call a plumber.
What a good seat feels like: the rubber is soft all the way around, with no hard edge or cracked lip. Press it down with two fingers and let go. It should sit flat with no rocking. If one side lifts, the chain is pulling it sideways or the flapper ears are not seated on both pegs.
Chain check by eye: after a flush, watch the flapper drop. It should fall straight and cover the opening in one motion. A small curve in the chain at rest is right. A straight, tight line is wrong, and so is a loop dipping below the flapper.
Advertisement
Fix 2: set the water level
On most fill valves the level adjusts with a screw on top of the valve or a squeeze clip on the float cup. Lower the setting until the water stops about 25 mm below the top of the overflow tube. Flush once and let it refill to confirm the new level holds. No parts, five minutes, and the constant trickle is gone.
Fix 3: replace the fill valve
- Water off at the shutoff valve, tank emptied and sponged dry.
- Put the towel under the tank. Unscrew the supply line nut from the bottom of the fill valve shank, then the mounting nut above it. Some water will come out; that is what the towel is for.
- Drop the new valve in, set its height so the top of the valve sits above the overflow tube, and tighten the mounting nut hand-tight plus a quarter turn. Over-tightening cracks tanks.
- Reconnect the supply line, clip the refill tube to the overflow tube, turn the water on slowly, and check every joint with a dry finger.
- Set the water level as in Fix 2 and flush twice.
If it still runs after the fix
Work this table in order. Change one thing, flush twice, and wait before you change the next.
| What you see | Likely cause | What to try next | | Colour shows in the bowl after a new flapper | Seat crust, flapper not centred, or chain pulling sideways | Clean the seat, reseat the flapper on both pegs, reset chain slack to about 1 cm | | Fill stops, then starts again every few minutes | Slow flapper seep dropping the level over time | Repeat the colour test and leave it a full 20 minutes; a faint colour trace still counts as a leak | | Water runs over the overflow top the whole time | Level still too high, or float rubbing the tank wall | Lower the float cup one notch, then check the float moves free with no contact | | Trickle you can hear but water sits below the overflow | Fill valve shutting slowly or grit in the valve cap | Turn water off, rinse the cap filter if your model has one, and retest; replace the valve if the trickle stays | | Weak flush after the flapper swap | Chain too long, flapper closing early, or low tank level | Shorten the chain one link at a time and keep the level 25 mm below the overflow top |
Give each test time. A tank that looks fixed in the first minute can still seep over the next hour. The colour test after 20 minutes is the check that counts.
Common mistakes
- Skipping the colour test and replacing parts by guess. The test takes 20 minutes and names the faulty part.
- Pulling the chain tight to be safe. Tight is the failure mode, not the fix. You want a small curve, not a straight line.
- Leaving the chain long enough to loop under the flapper. The flapper lands on the chain and never seals.
- Over-tightening the fill valve mounting nut. Hand-tight plus a quarter turn is the stop point. More force risks a cracked tank.
- Setting the water level at the top of the overflow tube. It belongs about 25 mm below that top edge.
- Using tank cleaning tablets with bleach. They eat flapper rubber early and turn a two-year part into a six-month part.
- Forgetting to watch the first three flushes. A flapper that seats twice and hangs once is telling you the chain or peg fit is off.
Done looks like this: tank fills, fill valve clicks off once, and the tank stays quiet. No refill sound after 30 minutes, no colour in the bowl after the test, and no water moving at the overflow tube. Touch the supply line and the tank base with a dry hand; both should stay dry.
When to stop and call a plumber
Water on the floor from anywhere except a sweating tank, a shutoff valve that will not close, supply-line leaks, or any crack in the porcelain. Those carry real water-damage risk and sit outside this guide. Everything inside the tank above the waterline is safe, reversible, and cheap to get wrong once.
A running toilet is also worth fixing for the bill alone. The rental property maintenance schedule on this site puts tank checks on a yearly pass for landlords for the same reason: this is the cheapest water leak in any house to find and the easiest to fix. Pair it with the other small plumbing jobs, fixing a leaky faucet and clearing a drain without chemicals, and most household water annoyances are handled in one weekend.