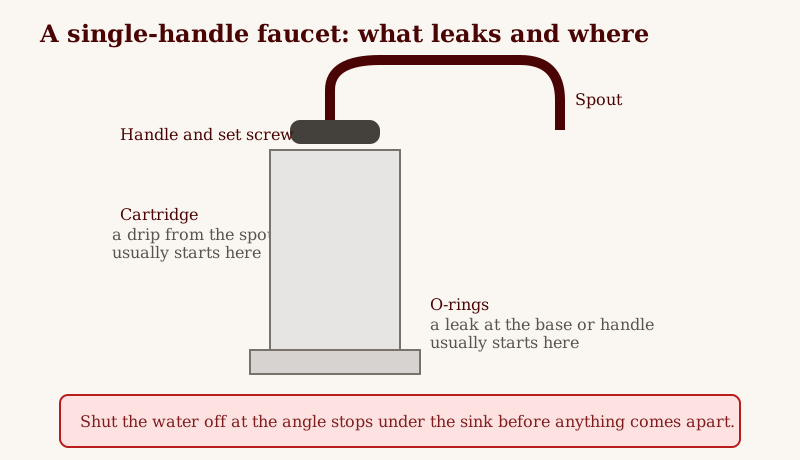
A faucet drip is a worn seal announcing itself, and the faucet tells you which seal if you look at where the water comes out. Water escaping from the spout is the main shutoff seal: the cartridge in a modern single-handle faucet, rubber washers in an older two-handle one. Water creeping from the base or under the handle is the O-rings that seal the moving body. Diagnose by location first and you buy one part instead of a rebuild kit lottery ticket.
Before anything comes apart: the water
Close the angle stops under the sink, the oval handles on the supply lines, and open the faucet to confirm the water is truly off and to drain the line. No stops, or stops that do not hold? Close the house main. Plug the drain and lay a towel in the sink. Every faucet contains at least one small screw that has been dreaming of the drain hole for years.
Tools and materials
- Replacement cartridge matched to your faucet, or washers and O-rings for two-handle taps
- Hex key set (most handle set screws are 3/32 or 2.5 mm), screwdrivers
- Adjustable wrench and needle-nose pliers
- Plumber's silicone grease (not petroleum jelly, which eats rubber)
- Old toothbrush and a cloth for mineral crust
Single-handle cartridge replacement
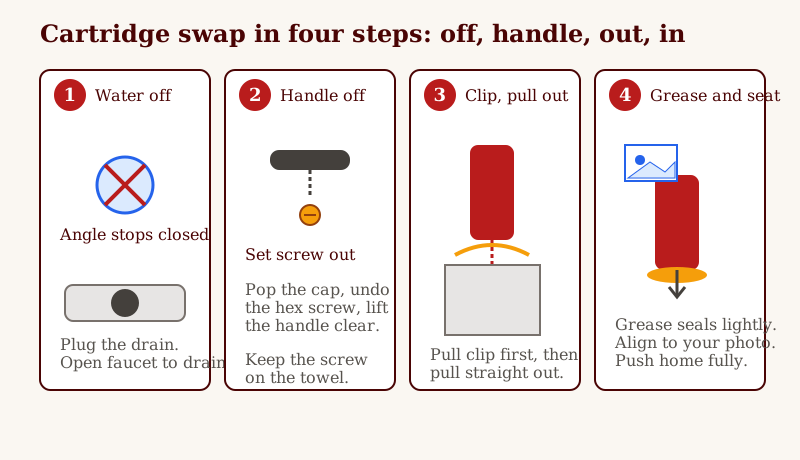
- Pop the decorative cap on the handle and remove the set screw. Lift the handle off. Some models add a dome cap and retaining ring; unscrew those by hand or with the wrench padded by a cloth.
- Note the cartridge orientation before it moves: there is usually a tab, a notch, or an H/C marker. Photograph it. Cartridges installed rotated 180 degrees swap hot and cold, which you only discover with a guest in the shower.
- Pull the cartridge straight out. If it resists, the retaining clip comes first (a U-shaped wire clip on many models), then grip the stem and twist gently while pulling. A cartridge puller exists for the truly stuck; most come free with patience.
- Clean the valve body inside with the toothbrush. Mineral grit left behind scores the new seals.
- Grease the new cartridge's seals lightly, align it to your photograph, and push it home fully. Reinstall the clip and hardware in reverse order.
- Water on slowly, faucet open mid-blend, and watch. Run it hot and cold, check under the sink with a dry hand, and leave a paper towel under the body overnight if you want certainty.
How each move should feel: the set screw snugs down with light hex key pressure; cranking it hard strips the small socket. A cartridge that is ready to move gives a firm, even resistance, then releases. A sharp crack or a gritty grind means grit in the body, so stop and clean before you keep pulling. The new cartridge should slide home with steady palm pressure and sit fully in one push. If the last few millimetres will not go, the alignment is off. Pull it out and line it up again rather than forcing it.
Grease amount: a pea-size smear worked thin over each seal is enough. You want the rubber to look wet, not loaded. Petroleum jelly is out; it swells and softens rubber seals. Silicone plumber grease only.
Give the test time. Run hot and cold for a full minute each, move the handle through its range, and shut it off firmly. A drip that takes 30 seconds to form is still a drip. The paper towel under the body overnight is the final check, not the first glance.
Advertisement
Two-handle compression faucets (older taps)
Each handle has a stem. Shut off the water, remove the handle and the packing nut, and unscrew the whole stem assembly. At its bottom sits a rubber washer held by a brass screw: replace it with the exact size. On the stem body you will find the O-rings or packing that seal leaks around the handle. If the washer has chewed a groove into the metal seat below, see the seat note in the FAQs; a new washer on a ruined seat lasts a month.
If it still drips
| What you see | Likely cause | What to try next | | Drip from the spout after a new cartridge | Grit left in the valve body, cartridge not seated fully, or wrong cartridge for the model | Pull it, brush the body clean, reseat with a full push; if it still drips, compare the old and new parts side by side | | Water at the base after new O-rings | O-ring rolled or pinched on install, or the ring is one size small | Reopen, roll the ring off and back on flat, grease lightly, and check it sits even all the way around | | Hot and cold come out swapped | Cartridge went in rotated 180 degrees | Turn water off, pull the cartridge, rotate it to match your photo, and seat it again | | Handle feels stiff or gritty | Dry seals or grit trapped under the cartridge | Grease the seals thinly and clean the body; stiffness that stays points to a scored body surface | | Flow dropped after the repair | Debris caught at the aerator during the work | Unscrew the aerator, rinse the screen, and run the faucet for 20 seconds before you refit it | | Two-handle tap chews a new washer fast | Seat under the washer is pitted or grooved | Replace the seat with a seat wrench where the model allows it, or re-face a fixed seat with a dresser |
Wait a full minute with the faucet off before you call it fixed. Slow seeps at the base can take that long to show. Run a dry finger around the base and under the sink after that minute.
Common mistakes
- Skipping the shutoff check. Open the faucet after closing the angle stops and confirm the flow stops fully before anything comes apart.
- Leaving the drain unplugged. The set screw is small, steel, and drawn to the drain opening. The plug and the towel are cheap insurance.
- Losing the cartridge orientation. One photo at the start prevents the hot and cold swap that only shows up later.
- Pulling the cartridge before the clip. The U-shaped clip holds it in; forcing against the clip bends parts that do not bend back.
- Using petroleum jelly on seals. It attacks rubber. Silicone plumber grease is the only safe choice here.
- Stretching O-rings over sharp threads to get them on. Roll them into place where you can; stretched rings shrink back uneven and leak at the thin spot.
- Cranking the set screw and packing nuts. Snug is the target. Stripped hex sockets and crushed packing turn a CAD $30 fix into a faucet replacement.
- Testing for five seconds and closing up. Mineral grit often shows up as a slow seep; the overnight paper towel catches what a quick look misses.
Done looks like this: faucet off, spout dry after a full minute, base dry to a fingertip, handle movement smooth with no grit feel, and the paper towel under the body still dry the next morning.
Order of attack if you are unsure
Take the old parts with you to the store. Faucet internals are a fit problem, not a knowledge problem, and the person at the plumbing desk matches parts faster with the original in hand than with any description. Photograph each stage of disassembly; reassembly is the photograph sequence backwards.
The same shutoff-first discipline runs through every plumbing job in this pillar: the running toilet, the clogged drain, and the bathtub reseal. None of them needs more than an hour, and together they stop the three water leaks that quietly run up most household water bills.